Back in December 2017 I released a feature film about my 1995 VW Golf Mk3 GTi. It was the first car I ever bought and it’s been with me for fifteen years. Towards the end of the film I mentioned that it was getting to a point where it needed a bit of tlc. Basically age was starting to catch up with the 24 year old GTi. On the list of jobs to sort out was a new exhaust system as the mild steel one that was fitted was corroded and leaking exhaust gas badly. Fast forward to July 2019 and I’ve finally got it fixed! But why did it take so long?
Well as I kick start the new Take to the Road’s Garage and Guides section on my website, here’s a little run down on the delay in getting my GTi sorted. About two months after the video was released, the Golfs MOT expired. The timing was just a little bit annoying and there was no way it would pass another MOT test with a large hole in the rear silencer. So I set about planning to replace the exhaust system itself. After a lot of research I opted for a brand new Jetex stainless steel sports exhaust. At this point in its life it felt like the GTi deserved a nice bit of tail pipe jewelry. So I took the plunge and ordered my first ever stainless steel exhaust.
 This article is Sponsored by Heritage Parts Centre

Shortly afterwards a nice large box arrived with some goodies inside. The model exhaust I chose was a resonated Jetex stainless steel system, without a catalytic converter. Basically I didn’t want something that was too loud or aggressive so I wasn’t bothered with a decat or a straight pipe setup. This GTi is pretty much standard and I wanted to keep it that way. So no silly upgrades being done here!

The next job was to get the Golf in the air and check the current rubbish mild steel system and plan it’s removal. Using a tilt ramp I inspected the underside and immediately spotted an issue… rust! Now the underside of the Golf is heavily unsealed from the factory and for the most part the underside is very good. But along the edges of the floor pan, just hiding underneath the aluminum heat shield, I could see corrosion. Not what I had wanted to find at all! Plus I noticed that the star washers and the spikes that help keep the shield in place looked pretty poor. Hmm not good really.

With the shield in place it was hard to see how much actual rust there was lurking behind it. A quick search of the inter web also revealed lots of horror stories of fixing spikes falling apart and star washers turning to dust. Which meant getting the shield back on correctly wouldn’t be easy at all. Basically I was walking into a potential underside minefield. Once I started taking bits off it could be a while before they go back on again and there was a potential need to do some welding. It was a risk I wasn’t willing to take there and then. So I needed another solution.

At this point real life took over and with other projects on the go, the Golf stayed in the garage while I worked out how best to tackle the issue. Months passed and suddenly 2019 arrived. Time flies doesn’t it?! Thankfully my local mechanic and classic car specialist came to the rescue. While my Bertone x1/9 was with him for a carb rebuild I mentioned the situation with the Golf exhaust. He offered to help and was happy for me to document the install process. Result!

Fast forward to July 2019 and the Golf GTi was on the ramp ready for its new Jetex stainless steel exhaust system. Below follows a rough guide on the install process. Your experience may vary depending on the system you have bought and whether your Golf is standard/has been played with in the past.

VW Golf Mk3 GTi Jetex Exhaust Install Guide
The first job after inspecting the underside is to lubricate all nuts and bolts. The exhaust system was changed on my Golf in 2008. So all the fixings were likely to be a bit tight. After letting them soak the first bit to remove was the rear silencer. This was pretty simple as it had actually rusted right through the pipe! Very high quality mild steel that had lasted less than half the lifespan of the original factory fitted exhaust! They don’t make them like they used too!


Next up was the support bracket just where the centre pipe connects to the catalytic converter. With this bracket removed it is easier to access the clamps holding this section of pipe in place. The nuts on these clamps were badly rusted. They refused to budge and started to strip their edges. Time to grab the grinder and cut away some rusty bolts.


A few minutes later and the bolts were free, which allowed for the centre pipe to slide back a little from the cat. At this point it is a good idea to use a support jack to hold the catalytic converter in place. The last thing you want to do is put stress on this piece of the system and the down pipe coming from the manifold.


With the bracket out of the way, it was time to remove the middle silencer and condemn the pile to the scrap heap.

With the cat supported the centre pipe slid back with a couple of assists from a hammer. Next up for removal was the support bracket just in front of the mid silencer. Again the bolts here were a bit rusty but they came off after some gentle persuasion.


Next up was the rust which was ground back with a wire brush on a drill and then painted to keep it from coming back. With the tunnel treated back on went the heat shield.


Thanks to the aluminium touching steel corrosion, larger circular washers and extra star washers were needed to make sure the shield stayed in position. Thankfully the original star washers didn’t all fall apart and were good enough to use again. The smaller ones were added for extra hold and security. Hopefully the shield won’t rattle now that it is back on!

With the shield back in situ it was now time to offer up the new stainless steel exhaust parts. At this point it was trial an error to see which pipe accessories in the kit would fit. A lot depends on the length of the cat and whether it is original or a replacement. Thankfully my Golf’s factory catalytic converter is still in good shape so I didn’t need to replace it.


To fit the centre pipe onto the cat one of the new short spacer pipes was used from the kit. This gave the correct distance and tightness of fitting for the centre pipe. One niggle with the centre pipe was a top mount rod which was sitting too close to the heatshield. As we were using the standard bar mount fitted underneath with the twin rubbers, this top mount wasn’t needed. So it was cut off. Again this will depend on the mounts you have in place already.


With that in place next up was the middle rear silencer, quickly followed by the new back box itself. One thing to note is the dent in the back box. This is intentional as it gives clearance for the rear heatshield mount point. At a glance it looks like the back box has been damaged in transit. But this isn’t the case.


At this stage it is important to note that it is a good idea to not tighten all the clamps and bolts right away. Lower the car to check the level of the back box and the twin pipes. A little twisting and tweaking can get everything lined up nicely. Once you are happy with everything, button down all the clamps and nuts. Job done!
Now stand back and admire all that shiny Jetex stainless steel goodness! Overall this install job went pretty well. The rust issues proved to be pretty minor which was a huge relief. The potential hear shield and star washer horror show didn’t materialise and the exhaust system itself fitted together very well with just one modification required. It is a nice kit and my mechanic was actually impressed with how the install went.
VW Golf Mk3 GTi Jetex Exhaust Verdict
After driving the Golf around for the past week I have to say I am very impressed with the Jetex Stainless Steel Exhaust. The engine note still sounds exactly like a Mk3 Golf which is important. I actually love the sound of the Mk3 2.0ltr engine and didn’t want to lose its distinctive character. Another detail is the fact the new exhaust isn’t loud or intrusive. There is a bit more depth to the exhaust sound under heavy acceleration and a touch more of a rasp as well at certain rev points. Basically this isn’t an exhaust that is going to drone away on a long motorway stint and give you a headache.

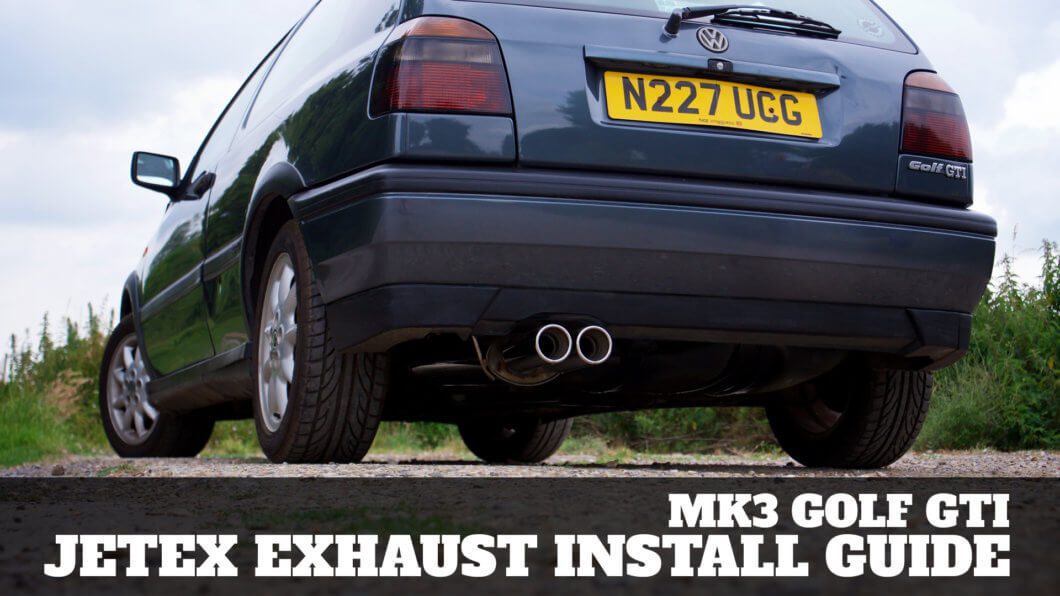
But the main plus is the look. You got to admit we petrolheads love a stainless steel exhaust. That’s because they look cool! This is a very smart looking exhaust system and the twin pipes look perfectly at home on the back of the GTi. It is very tidy with just the right amount of size to fill the gap in the bumper. Not too big and not too small.

Now that my Mk3 Golf GTi back on the road after being idle for a year, I’m really looking forward to using it more over the summer. And that exhaust is going to make it a little bit more fun! Happy Days!


Pingback: This Golf GTi is a Keeper - 1995 VW Golf GTi Mk3 8v Review